Saturday, October 5, 2013

Laminating the Chine

I half expected the boat to be engulfed by those little sandcastles that termites make when I came back to the boat shop this week after a nearly five month absence. No termites, thank goodness, just a lot of black mold. I welcome the mold. It comes with the incredible amount of rain we've received over the past several weeks. Rio Grande City is now a tolerable grassland rather than a post-apocalyptic dust bowl. 

NASA was wonderful. I developed some algorithms for optimizing medical kits for spaceflight. And met real astronauts. The whole experience was incredibly inspiring. Fresh off this NASA high, I've re-committed to the boat project. This thing WILL GET DONE.

My brother came in on Sunday for a week of boat building. We actually spend the first few days battling the cockroaches (รก la Stormship Troopers) that made themselves welcome during my long absence. We finally got around to some boat work on Thursday and will have the first layer of the chine glued in place by the time he leaves tomorrow afternoon.


This week at my house. Pro tip: Don't leave potatoes in cabinet for 5 months.

My mentality re the boat project has shifted. I was beginning to feel paralyzed by the sheer size of the project--  by all the work remaining and all of the things that could possibly go wrong. I am now thinking no further than getting the chine laminated. Then I'll think no further than cutting the notches for the stringers on the bottomsides. Etc. This seems to be a more effective mindset, as I'm pretty sure I'll be able to get the chine in, and I'm pretty sure I can cut a few notches.

An acquaintance from college sent me this poem written by a boatbuilder. While at the moment I can't relate to the romanticization of boatbuilding in the body, I was particularly amused/struck by the first line: 
And so it is, the boat has come to own you

Indeed, building Luna came to own me. I resented my previous self who thought building a gigantic sailboat in small-town Texas was a good idea. Time away from Luna was exactly what I needed to build up the guts to finish her. Looking forward to the next few months of boat work!
Ali and Logan Keenan
The not-so-little brother and I.

Buehler sailboat build epoxy
Slinging epoxy.

Buehler Emily sailboat build
The first chine piece glued in place.

Tuesday, May 21, 2013

Quick update

Very little boat work happening recently. Lots of other fun things happening, though! In the last two weeks I finished all of the remaining classes I need for my master's degree, got my eyeballs lasered, and got a summer internship with NASA. GO SCIENCE!! That means that I won't be accomplishing much of anything on the boat this summer (though I'm hoping to get a few small things done in the next week before leaving), but I'm excited to come back in the fall and be able to work on the boat a lot more, as I'll only be splitting my time between thesis research and the boat!

Obviously, the plan I laid out back in September (?) to finish this thing has not come to fruition. The few, sad things I accomplished on the boat in the last 5 months: 
1) cut out all remaining chine notches 
2) ripped and planed a bunch of 8/8 rough white oak to 3/4" to laminate the chine and stringers with
3) spiled, cut, and installed one lonely piece of wood in the chine notches

I've been struggling for the past several months with whether it's a smart idea for me to finish this project. I desperately want to finish what I've started, but there isn't anything for me career-wise in the Valley (unless SpaceX comes to Brownsville--fingers crossed) and the boat isn't in any condition to be moved yet. I don't particularly relish the idea of living in Rio Grande City any longer, and part of me wants to donate everything I own and just get out. Ramon is moving to Austin next month to work on quantum this-and-that theory stuff (exciting, even if I don't understand it!), but I'm not sure I can handle living in Rio without him. So, the plan is to live one last single semester in Rio while I finish my degree and make a balls to the wall effort on the boat to get it in good enough shape to move it to a boatyard by December. Good enough shape = planking + fiberglass. Yup, that's the plan.
I can see clearly now, the blur is gone. ♫♪


Sunday, November 18, 2012

Getting ready for the chine

      My little brother came in yesterday, and he, Ramon, and I spent the afternoon at the boat shop ripping 8"x2" rough-sawn oak into 8"x1" halves with my cheap little Harbor Freight table saw. I'll be using these for the chine lamination after running them through the thickness planer. 
      Lots of time on this build has been spent trying to morph the wood I have into the wood I want. First, for the keel I bought construction-grade Southern yellow pine which promptly warped. Ramon and I used all manner of clamp configurations to get that stuff to laminate up into semi-straight pieces. Then, I milled the frame lumber from rough sawn white oak. Ripping the full oak pieces thickness-wise has been our toughest challenge yet. My table saw doesn't quite cut through half of the 8" width so we today we ran the pieces through on each side three times so we wouldn't blow a fuse (though we did manage switch the breaker multiple times anyway) and then ran a Sawzall down the middle to finally split the thing. Overall, though, we had a great day and worked off the beer and sushi from last night.

Boatbuilding in Hindsight:
1. Pay the little bit extra to have the wood milled.
2. Get a bandsaw.
3. I'd really like to have some nicer power tools for the next build, but I certainly don't regret going with the cheap stuff the first time around (particularly because my shop is so exposed to the elements).

Here the frames are squared and braced from the outside. I'll add bracing on the inside before laminating the chine, then remove the exterior bracing to install the stringers.

Thursday, November 15, 2012

A bit of inspiration

Yesterday, a fellow boat builder at the university pointed me toward this build. Rather than writing final papers and preparing for the end of the semester, I've been spending hours watching their YouTube videos and reading their wonderfully written essays on everything from choosing to live in the "ghetto" to smuggling livestock vaccines across the Mexican border. Their website also chronicles their TWO submarine builds. I can only hope to live my life as creatively and resourcefully as these folks!

www.svseeker.com


They are building a 74 ft. junk with a cargo hold and capacity for a small metal-working shop.


Saturday, November 10, 2012

Leaving Purgatory

Trailer update: I am pleased to announce that I have left corroded screw purgatory and am now in renovation heaven. The trailer, on the other hand, looks like she's been to hell and back:
Don't trust your children to me.

She's very close to getting a coat of fresh white paint!

The Launch Timeline

     I have a recurring dream where I finally make it out to the boat shop after weeks of neglect only to find the place blanketed in Texas dust and the keel looking like Swiss cheese due to termite damage. A few of the frames are but piles of sawdust. Rather than feeling horrified, I feel relieved. I walk back to the house and order plans for a smaller boat and start packing my things.
     Lately, I've felt defeated by the size of this project. Previously, I tried not to set a time frame for this project because I felt like I had no realistic idea of how long this thing would take me-- and I didn't want to stress about it. But now, for my own sanity, I need a timeline to launch. Ramon and I sat down last night and hatched our plan:

2013
January: Stringers, chine, and cheeks installed
February: Frames, stringers, chine faired; chamfer on bow and stern
March: Deck beams installed, footwell framed, hatch framed
April: cabin trunk "cutout"? framed
June: Planking complete, deck laid, hull glassed
July: Install bulwarks, start working on interior
August: Hatches complete, cabin trunk completed and glassed, paint

Beginning of September, 2013: The launch!  
Also-- our last days here!

We plan to live near Port Isabel and finish Luna's interior at the marina while I finish up my masters program. 

Depending on how long funds last, and how long it takes to outfit her, we hope to set sail by the end of 2013. That's only a little over a year away, making it a pretty ambitious (foolhardy?) goal, but it feels good to have something to work toward.

Also-- today I finished squaring up the frames! The next step will be  installing the chine.

Tuesday, September 18, 2012

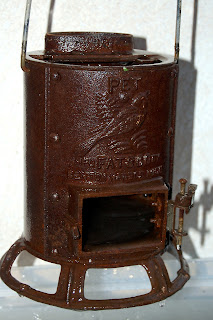
Electrifying the Galley Woodstove


www.fatscostoves.com

I found one of these little cuties on eBay for around 50 bucks several years ago-- long before I ever thought I'd be in a position to build a boat. I bought it rather hopefully anyway. Lugging it to various apartments year after year as I finished college, I dreamed of the day I would warm my hands around its tiny crackling fire while moored in a Norwegian fjord. 

In January 2010, when I finally mustered the guts to get going on the boat project, I dragged it out of its box and found that it was completely encrusted in rust. The tiny door even broke off in my hand when I tried to open it. A major restoration was needed.
I decided that old-fashioned elbow grease and a wire brush were for the birds on this project. I was going to zap the rust off that thing. More technically, it is possible to electrolytically remove the rust by reducing the iron oxide Fe2O3 (aka red rust) to Fe3O4 (aka black rust), which detaches from the underlying iron and flakes off really easily. My brother Logan was visiting at the time, so we figured that if one of us got electrocuted, at least the other was there to make the drive to the county hospital. 

Basically, you get a trickle battery charger, attach the positive lead to a sacrificial anode and the negative lead to your rusted piece. This needs to be done in an electrolyte bath--- "Arm and Hammer All Natural Super Washing Soda" works best for this. Make SURE that the alligator clip attached to your anode doesn't get in the bath, because it'll rust the clip pretty badly.

This site describes the process in detail. 

The setup. Note the black clip is attached to the artifact to be cleaned and the red clip is attached to a sacrificial anode. The anode should be plain steel-- not galvanized, and definitely NOT STAINLESS as this will leach toxic chromium compounds into your electrolyte solution.

Note that the alligator clip on the sacrificial anode is up and out of the electrolyte solution. You don't want to sacrifice your clip, too.

The anode is getting pretty rusty at this point. It's a good idea to take the artifact out of the solution once in a while, rub it a bit with a Scotch Brite pad to get the black rust off and put it back in a different position than it was in before. You can see all the bubbles created as water is being broken down into hydrogen and oxygen gas.
After all of that my little Fatsco stove looked pretty good. I applied some stove polish and burned a little wood fire in it. I'll include photos of the finished 'restoration' when I receive the replacement door, latch, and hinges.
The little brother suggested we "capture the hydrogen and blow it up." I nixed that idea.